Finishing Plywood Walls & Painting -In 4 Ways [Smooth Finish]
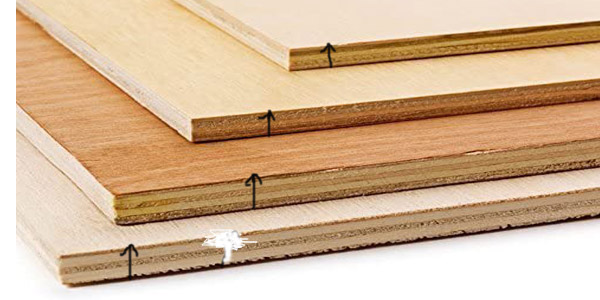
Architects and designers use plywood for an aesthetic purpose as it gives you a smooth and unique finish. In the modern era, it gives a new look to our interior. Also, it is lightweight, strong, easy to install, and inexpensive.
Plywood gives you a beautiful and warm look at a limited budget. Though, it cannot be used everywhere. Also, the look of the plywood depends on its finishing. Thus, we are going to let you know about finishing the plywood walls in effective ways. Stay tuned.

Table of Contents:=>
Plywood as Wall Component
You can install finished plywood as a material of the wall in two ways.
One way of installing this is to remove the existing sheetrock and directly nail the plywood to the stud of the wall. The other way of installing this plywood is to install this over the existing wall element.
The second way will save both your money and time.
When Plywood Can’t Be Used
You can’t use plywood as a ceiling or wall material if there is water in that area such as in a bathroom or in a kitchen. If you use plywood in these areas then the plywood will warp because of the level of humidity.
Also, you can’t install plywood below-grade rooms. It can be considered if there are special vapor barriers in those rooms. But still there remains a chance of affecting because of the moisture level. Thus, experts don’t recommend it. It is unsafe to use damp plywood as it can refuge bacteria and mold.
Size of Plywood for Walls
The size of the plywood wall is very important especially for a newly framed house. Because it makes the wall counteraction to bending and twisting. The thickness of the plywood depends on two things such as whether you nail it only to the plywood or through the sheathing. Now, we are going to discuss the perfect width, length, and thickness of the plywood. Don’t go anywhere.
Width and Length of Plywood
Usually, all plywood sheets are 4 feet in width. But you can also find sheets of 8 feet and 12 feet long. If you want to install the plywood sheet vertically then it would be wiser if you use long sheets. Because longer sheets don’t allow you to make a horizontal layer in the middle that improves water insulation and resistance. [Read Also: 9 Best Plywood for Painting to Save Beautiful Artwork]
Thickness of Plywood
For sheathing walls of a 16-inches ideal stud spacing, 3/8-inch plywood is referred to as the International Residential Code. This is applied when the supporting is Tacked to the stud by the sheathing. The IRC has designated the minimal thickness of the plywood as 0.5 inches if the nails enter into the sheathing instead of studs. Practically, maximum builders use half-inch plywood even though they penetrate the siding to the studs. You may find a 15/32-inches of plywood while purchasing the half-inch one, both are the almost same thing.

Factory-made finished plywood is better as it gives you an easier, quicker, and cleaner cabinet. It is good looking, fast-drying, smooth, and easy to apply a finish. But it is not possible to always get them as they don’t stock them always. That’s why, here, we are going to describe to you the process of finishing plywood. Stay tuned.
Finishing Plywood Wall – 3 Effective Process to Get a Beautiful Look:
1. Prepare the Surface of Plywood
First, lay the sheet of plywood on a bench or sawhorses at a comfortable height where you can work easily. It is easy to work with full sheets if the room is big enough. If the room is not big then cut the plywood sheet into small sections.

To prepare the plywood sheet first remove the splinters from the brink of the sheet. Then sand the plywood sheet with a 100 grit sandpaper. Try to use an orbit sander for this purpose. Then, remove the dust by using a vacuum cleaner or cloth. This step is easy and takes less than ten minutes.
2.Hand Application
Applying the finish by spraying is a bit messy. On the other hand, applying it by hand is less messy and also fast. You have to wear a respirator while doing this. Because in either case, there is a chance of saturating solvent fumes.
First, apply the shellac by using a roller. Try to begin applying in the middle and then slowly go through the edge. Also, distribute the shellac as fast as possible because it dries quickly. Try to do it evenly and don’t overwork when the shellac gets sticky.

After that, leave the shellac for 10 to 20 minutes and let it dry. Then sand the raised grain lightly by using a 320 grit sandpaper. Sand it for 4 to 5 minutes only. After that, remove the dust by using a damp cloth. Also, wrap the roller up in a bag after finishing your work so that you can use it later.
After this, imbed a deep splotch of the waterborne floor finish. Then take a roller tray and tumble the varnish into the tray. Take the pad and sause it into the varnish. Try to distribute this evenly and start doing this from the middle. Then gradually go toward the end. This product levels out nicely. But for this, you have to flood it on. Also, let it be alone for some minutes. Don’t overwork the varnish and apply it as quickly as possible. After applying the varnish, let it dry for 25 to 30 minutes. Don’t forget to remove the pad and wash it nicely so that it can be used on the next sheet. Read Also: Staining Birch Plywood: 4 Steps to Get a Richer Finish.
3. Spray Application

If you use the HVLP spray then it will take less than 1 minute to veil the sheet of plywood. You have to use a seal coat to fill the cup of the gun. After that, spray the plywood. Make sure that the coverage remains consistent. Then wait for 15 to 20 minutes and let it dry. After drying, sand the surface evenly and lightly by hand.

There will be a spray gun that you need to clean. You can use absorbent rags and denatured alcohol to clean. Make sure that all the shellac remainder is cleaned. Cleaning is very important when you are going to switch to a clean waterborne finish. It will defile the work even if you leave a small amount of shellac. Start cleaning from the cup itself. After that take some clean alcohol and fill the cup with it. Also, spray the alcohol through the gun so that it cleans the fluid pathway. Repeat this process. [Read Also: Best Finish for Wood Kitchen Table Top 2020]
After that take some waterborne finish to fill the cup and spray the periphery. After spraying, clean the spray gun out by using water. Let the sheet dry for 20 to 30 minutes. Then you can move this.
Painting Plywood Walls
The plywood needs preparation before painting just like any other thing. The quality of the finished plywood would be better if the preparation is good. You should use good quality plywood for roofing, flooring, and sheathing. Otherwise, it will not turn out well as the uneven surface will be shown through the paint.

Things that will be needed
- Sanding tool or hand sanding block
- 80 grit sandpaper
- 120 grit sandpaper
- 220 grit sandpaper
- Cloth
- Primer > Check on Amazon
- Paint roller, tray
- Paint
First, sand the plywood by using a hand sanding block until it becomes smooth. In the beginning, the surface will be rough. That’s why to use an 80 grit sandpaper. Then gradually sand with the finer grit sandpaper such as 120 grit and 220 grit sandpaper.
Then, wipe the plywood to make it clean by using a dry rag. It will remove the dirt created by sanding. Don’t make the rag wet. Otherwise, the grain will be raised by the water and you have to sand it again. Again, swab the dirt. But this time use a tack cloth. It will dispel the finer dirt.
After that, take a paint tray and pour the primer. Then roll the roller. After rolling it into the paint, splotch the roller with primer and roll the primer. Continue this process until the plywood is fully covered. Then let it dry for 24 hours at least.
Take a 220 grit sandpaper. Then sand the plywood with the 220 grit sandpaper lightly to make it smooth. Don’t remove the primer. Then wipe it with a cloth to remove the dirt.
Follow this process again. After complete, the second coat let the plywood dry overnight. Again take a 220 grit sandpaper to sand it. Also, wipe it with a cloth to remove the dirt.
After that, take a paint tray and pour your desirable paint into it. Take some paint and wet the roller and then apply it to the surface of the plywood. Roll in the way of the wood grain. Try to apply the paint evenly. After applying the paint let it dry overnight.
After that sand, the plywood again with a 220 grit sandpaper. Wipe it with a cloth and make it clean. Then, apply a coat of paint for the second and final time.
Now you already know about finishing plywood walls. All you have to do is go through the basics again to know it from the core. Also, let us know if you find this article helpful or not. Mention your thoughts in the comment box.
Last Updated on February 9, 2021 by Rogers Weber
[As an Amazon Associate I earn from qualifying purchases.]


